

Getting started: Develop in WSL2 for XM Cloud
In the Sitecore universe, Sitecore XM cloud is the next best thing. Not having to develop for Sitecore on your local machine, but in the cloud, is a huge step forward. Sebastian Winter, Developer Advocate for Sitecore, did an excellent job with this video to get you up and running with headless development for Sitecore XM Cloud on Windows. However, frontend developers tend to prefer to work on MacOS, Linux, or WSL2, in order to get some (major) speed improvements. For WSL2, it does require some setup. In this blogpost, I'll explain how to setup your machine to develop for Sitecore XM Cloud in WSL2. I'll describe how a fresh Ubuntu 22 instance can be setup to get you ready.
Steps to take
- (Optional) Install a fresh ubuntu 22 WSL instance.
- (Optional) Install Oh-my-posh for an awesome prompt - WITH Sitecore CLI integration!
- Configure the Git Credential Manager (GCM) and clone a repo skip
- Install the Sitecore CLI (and see your prompt shine)
- Install Frontend tooling natively in order to build your xmcloud installation
(Optional) Install a fresh ubuntu 22 WSL instance
If you don't have a WSL2 instance yet, you can install one by following the steps on this page. I prefer to use Ubuntu 22, but you can choose any distro you like. For my setup, I chose to install a second instance, following this blogpost.
(Optional) Install Oh-my-posh for an awesome prompt - WITH Sitecore CLI integration
I recently wrote a plugin for oh-my-posh for the Sitecore CLI integration.
Follow the installation instructions for Linux and windows terminal over here.
Below are the steps that I followed:
-
Install Oh-my-posh and install a nerdfont
sudo apt install unzip # install unzip curl -s https://ohmyposh.dev/install.sh | sudo bash -s # Install oh my posh oh-my-posh font install # select Meslo from the list -
Configure Windows terminal to use the correct font
To ensure correct rendering of the glyphs you will need to enable the option Use the new text renderer ("AtlasEngine") in your terminal settings. For further details, see here. Also, make sure to setup the font that is being used in terminal
{ "profiles": { "defaults": { "fontFace": "MesloLGM Nerd Font" } } } -
Download a custom theme. I really like the this one. Make sure to download it to your home directory:
curl https://raw.githubusercontent.com/JanDeDobbeleer/oh-my-posh/main/themes/jandedobbeleer.omp.json --output custom.json -
Add this specific Sitecore Segment to the custom theme:
{ "background": "#c386f1", "foreground": "#ffffff", "leading_diamond": "\ue0b6", "style": "diamond", "template": " {{ .EndpointName }} {{ if .CmHost }}({{ .CmHost }}){{ end }} ", "trailing_diamond": "\ue0b0", "type": "sitecore" }, -
Change the prompt. Add
eval "$(oh-my-posh init bash --config ~/custom.json)"to the end of your ~.profile file -
close your session and open it again. Your prompt should look something like this now:


Configure git and clone the xm-starter-kit
An important note first. When cloning a repo, this should happen on the WSL filesystem, so DO NOT USER YOUR MOUNTED DRIVE (starting with /mnt/c....). This will have severe performance implications.
When cloning a repo, on a fresh Ubuntu machine, you will be prompted for a password:
bas@Monstar:~/git$ git clone https://github.com/BasLijten/sitecore-xm-cloud-test
Cloning into 'sitecore-xm-cloud-test'...
Username for 'https://github.com':
Git is prompting for a plain password, and this is deprecated functionality on Github. I prefer to use the git credential manager for this, which can be referenced from windows:
git config --global credential.helper "/mnt/c/Program\ Files/Git/mingw64/bin/git-credential-manager-core.exe"
After configuring this manager, you won't be prompted for a username or password and the repo will be cloned.
bas@Monstar:~/git$ git config --global credential.helper "/mnt/c/Program\ Files/Git/mingw64/bin/git-credential-manager-core.exe"
bas@Monstar:~/git$ git clone https://github.com/BasLijten/sitecore-xm-cloud-test
Cloning into 'sitecore-xm-cloud-test'...
warning: git-credential-manager-core was renamed to git-credential-manager
warning: see https://aka.ms/gcm/rename for more information
warning: git-credential-manager-core was renamed to git-credential-manager
warning: see https://aka.ms/gcm/rename for more information
remote: Enumerating objects: 309, done.
remote: Counting objects: 100% (309/309), done.
remote: Compressing objects: 100% (267/267), done.
remote: Total 309 (delta 9), reused 238 (delta 4), pack-reused 0
Receiving objects: 100% (309/309), 286.02 KiB | 2.62 MiB/s, done.
Resolving deltas: 100% (9/9), done.
bas@Monstar:~/git$ ls -alF
total 12
drwxr-xr-x 3 bas bas 4096 Oct  2 09:48 ./
drwxr-x--- 3 bas bas 4096 Oct  2 09:48 ../
drwxr-xr-x 8 bas bas 4096 Oct  2 09:48 sitecore-xm-cloud-test/
bas@Monstar:~/git$
if making use of oh my posh, you'll see a nice git segment in the prompt, sharing information about the current state:

Install the Sitecore CLI (and see your prompt shine)
First, the dotnet CLI needs to be installed, as Ubuntu doesn't ship with it. The sitecore cli requires dotnet-6. I used this documentation to install it:
sudo apt-get update && \
  sudo apt-get install -y dotnet-sdk-6.0
After this update, the sitecore cli can be restored:
dotnet tool restore
Now, you're good to go to login on your sitecore cloud environment:
dotnet sitecore cloud login
The CLI will prompt to login via a browser. Just CTRL+click this link, and you'll be able to authorize your CLI. Please take note of the prompt - an extra segment has been added which gives contextual information on which environment you are currently using. In this case, it points to "Default" (this is the default behaviour)
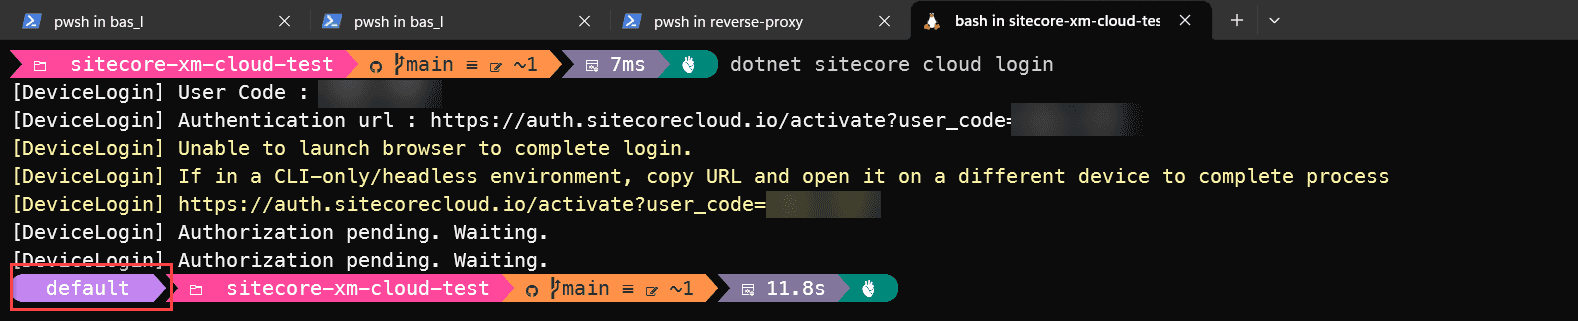
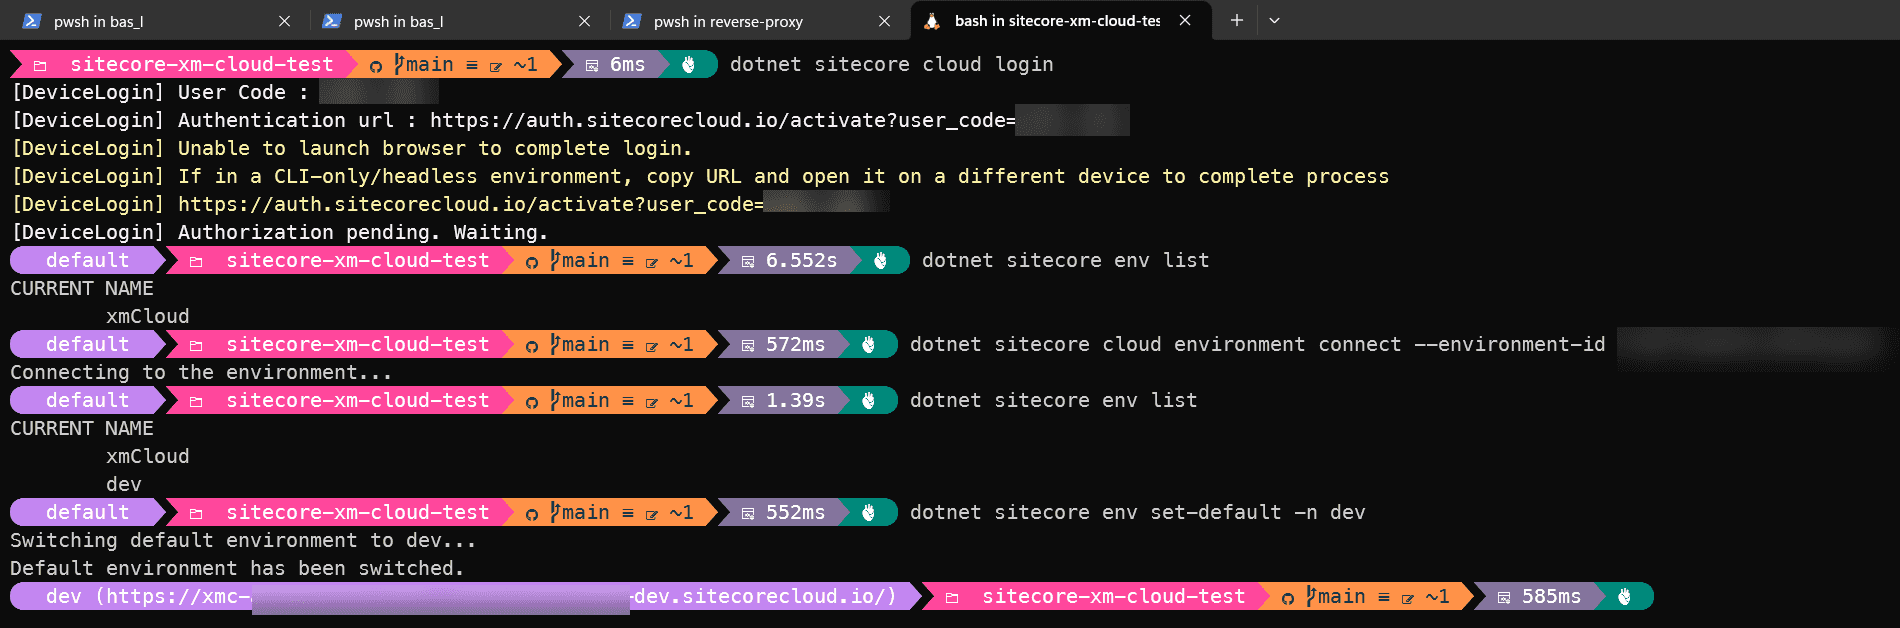
After authorizing the CLI, connect to a new environment (I'll use a dev environment in xmcloud in this example), and verify that the environment has been added.
dotnet sitecore cloud environment connect --environment-id xxx
dotnet sitecore env list
Using the following command, your active environment, can be set. As I added dev, I'll change my default environment to dev. Using the env list command, you can verify that the default environment has been changed to dev
dotnet sitecore env set-default -n dev
dotnet sitecore env list

CURRENT NAME
        xmCloud
*       dev
Even better: this reflects in your prompt as well!
Install Frontend tooling in order to build your xmcloud bits
In orde to use the tooling that has been written (and optimized!) for linux, make sure to not include the windows-path in your PATH variable. This prevents Linux from using installed tooling which might have been installed on Windows. This can be done by adding the following lines to your /etc/wsl.conf:
[interop]
appendWindowsPath=false
You have to close your WSL-session, and run Restart-Service LxssManager under administrator credentials. Afterwards, open a new WSL2 prompt. When running which npm and it doesn't give any results, you're good to go. Now, you can install the frontend tooling. Let's start with nvm:
curl -o- https://raw.githubusercontent.com/nvm-sh/nvm/master/install.sh | bash
Using this node version manager, you can install a specific version of node, for the xmcloud workload I sugged to use the latest LTS version:
nvm install --lts
Switch to do directory which your rendering host resides in and run an npm install:
cd src/sxastarter
npm install
Last, but not least, we'll need to make sure that vscode can be started from WSL2. Because we prevented the WindowsPath to be added to the PATH variable, we'll need to add the vscode path manually. make sure to replace {USERNAME} with your username:
export PATH=$PATH:"/mnt/c/Users/{USERNAME}/AppData/Local/Programs/Microsoft VS Code/bin"
Test if code can be started, and if this is the case, make this change permanent:
echo 'export PATH=$PATH:"/mnt/c/Users/{USERNAME}/AppData/Local/Programs/Microsoft VS Code/bin"' >> ~/.bashrc
Summary
Setting up your WSL2 distribution doesn't take much time, but it saves precious time. Having a masterful prompt, accompanied with navtively optimized tooling is invaluable. Get started today!